How to Send Transaction Emails
What are transaction emails?
A transactional email is a type of email sent to individuals based on specific actions or transactions they have performed.
Unlike marketing emails, which are sent to promote products or services to a broad audience,
transactional emails are triggered by a user's activity and contain information relevant to that specific transaction.
Examples of transaction emails:
- Order Confirmations
- Shipping Notifications
- Account Creation
- Receipts
- Invoices
- Appointment Reminders
- Subscription Renewals
- Payment Failure Notifications
- Policy Change Notifications
- Review/Feaback Requests
- etc.
Why use an external service to send the email? (instead of using a regular gmail/Outlook address through monday)
- You want to use html, so that the email looks more professional.
- You want to use a template, because all emails are identical.
- You don't want to clutter your gmail, Outlook accounts.
- External services may improve deliverability.
External services connections provided
At this point, we are offering a connection with SendPulse and
Mailgun.
Both offer a free plan, make sure you check which one is more convenient for you.
We may include other services in the future. To suggest a new service, open a ticket in our in-app ticket system or use our Contact Page.
How to set up the connection
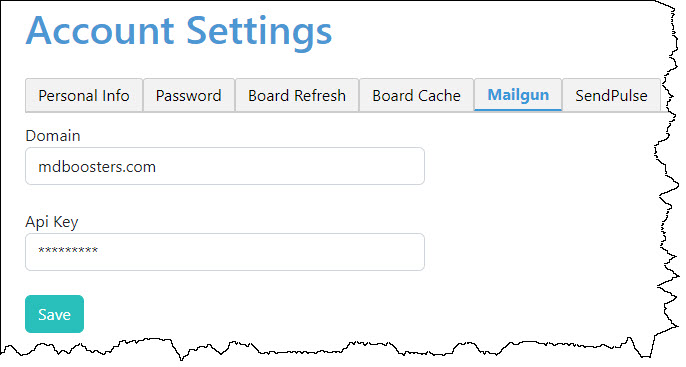
To set up either or both connections, click Settings in the left pane and, once the Account Settings page is opened, click either the Mailgun
or SendPulse tab.

Both services require different credentials that you may find in your account settings on their platform:
- For Mailgun: Domain and Api Key
- For SendPulse: User Id and Secret
Please refer to each service's documentation on how to generate your api credentials
What templates to use
You don't have to use a html template, but it makes sense to do so.
You have 2 options:
- You use the template builder offered either by SendPulse or Mailgun. Again, please refer to each service's documentation on this.
- You use our Library page to create it.
In both cases, you may include variables (placeholders) for data that you want to merge into the template.
What function to use to send the mail
If you use a template created in our library or a simple text message
Use the SEND_WITH_MAILGUN or SEND_WITH_SENDPULSE function.
1: [From]="notifications@example.com"
2: [to]={Email}
3: [Subject]="Your order confirmation""
4: [Content]=GETCONTENT("Order Receipt",{FirstName},{Client Reference},{Order#})
5: [Send]=SEND_WITH_MAILGUN([From],[To],[Subject],[Content])
6: {OrderStatus}=IF([Send],"Confirmation Sent")
As you can see in the code above, the SEND_WITH_ function needs a FROM address, a TO address, a subject and a content.
In this case, the content comes from the template designed in your Library page. The templates contains 3 placeholders,
<1>, <2> and <3>. These placeholders are replaced by {FirstName}, {Client Reference}, {Order#} thanks to the GETCONTENT function.
The SEND_WITH functions are executed synchronously (i.e., the formula waits for the acknowledgment from the service), then the function
returns either True or False. This allows us to set a Status column to Sent in the example above.
If you don't want to use a template, because your content is very simple, you could simply build your content without the library:
4: [Content]="This email is to acknowledge the receipt of your order."
Or
4: [Content]=CONCATENATE("Hi ",{Firstname},", This email is to acknowledge...")
If you use a template created in Mailgun or SendGrid
Use the SEND_WITH_MAILGUNTEMPLATE or SEND_WITH_SENDPULSETEMPLATE function.
1: [From]="notifications@example.com"
2: [to]={Email}
3: [Subject]="Your order confirmation""
4: [Template]="OrderConfirmation"
5: [Variable1]=CONCATENATE("Firstname:",{FirstName})
6: [Variable2]=CONCATENATE("ClientReference:",{Client Order Reference})
7: [Variable3]=CONCATENATE("OrderNumber:",{Order Number})
8: [Vars]=CREATELIST([Variable1],[Variable2],[Variable3])
9: [Send]=SEND_WITH_MAILGUNTEMPLATE([From],[To],[Subject],[Template],[Vars])
10: {OrderStatus}=IF([Send],"Confirmation Sent")
The approach is very similar to the previous one. The only difference is that the placeholders in the template are referred to by their name.
In this case, the template contains 3 variables named "FirstName", "ClientReference" and "OrderNumber". So, for each variable, we need to
create a string of characters: VariableName:Value. We then assemble them in a list and use this list in the function.
Both SEND_WITH_MAILGUNTEMPLATE and SEND_WITH_SENDPULSETEMPLATE work the same way. The only difference is that, on line 4, Mailgun works
with the template name and SendPulse with the template id.